Documentation
Legacy Systems Inventory Management
Please read through to understand how to provision, install and use the LSIM application
If you have any questions that are beyond the scope of this document, Please feel free to email us at support@legacy.net.in.
Provisioning
LSIM is a cloud based application, which is primarily distributed using the Saas (Software as a Service) model. Follow the steps below to setup your LSIM application:
- To have a free Demo environment provisoned for you, please go to https://lsim.app/demo.html and fill up the details. You will receive an email on the email ID provided once the environment is ready for you.
- For a new production instance provisioning, please Contact Us. You can also just send us a message through Whatsapp or Twitter as well
- We will assist you to have the system installed and accessible to you based on the method of installation you choose
- If you opt for the Cloud based installation, here is what you will get:
- You will have a dedicated installation of LSIM in an enterprise server, with dedicated database for your business
- All you need will be a URL to access and use the application
- You can also install the application on Windows, Linux, MacOS or Android as a Progressive Web App
- The server capacity and clustering, backups etc can be customized according to the your needs
- By default, the database backup will be taken once every day, and the last 7 days backups will be available
- The LSIM software will be automatically updated to the the latest stable version. This will happen in the background, and you will be notified in advance for all updates other than urgent security bugfixes . You can opt out of minor updates, but major updates will be pushed every three months
- If you opt for the on-premises installation, here is what you will get:
- A LSIM instance will be installed on your machine (Windows, Linux or MacOS)
- The installed software version will be the latest stable version available at the time. This will NOT be updated automatically to the next versions
- The application and the database will reside in your own system, and you will be responsible for the backup of the database
- The AMC purchase for on-prem install will include all stable software updates, but these updates will need to be installed manually
- Other than these two type of installation, you can also choose to install LSIM in your own servers/Cloud Account. Please contact us for more details
Install Options
There are various configurations you can choose from to customize your LSIM installation. When you ask for an installation or demo, please specify the below configuration options so that the installation will be optimized for your specific usage
company_name: The name of your company to be displayed on the application and PDF pagespdf_logo: The company logo to be displayed on the login page and PDF pagestax_percentage: The GST/Tax percentage to be configured systemwideaddress: The company address to be displayed on PDF pagescontact_phone: The contact number to be displayed on PDF pagescontact_web: The email/website address to be displayed on PDF pagestax_number: The Tax ID number to be displayed on PDF pages. Iftax_percentageis set to 0. this setting is ignoredcurrency: The default currency code (eg: INR/USD/AED) for your businessmedical_env: Use features specific to medical industry like Controlled Drugs, Doctor management, etcuse_salesman_code: Enable a second layer of authentication to generate invoicesemployee_edit_product / employee_edit_po / employee_edit_expense: Manage privilages for non-admin usersui_auto_bg_color: If enabled, the background color will be generated using the other color settings (using the settings screen). Otherwise, you will be able to select from a list of background images from settings page
Apart from these settings, there are various settings you should decide based on the size of your business. The below settings will affect your subscription. In case of an on-premises install, the max settings can be set to a much bigger number if needed
multi_branch: Set this toyesif you have multiple branches or offices and you want to manage all of them in one LSIM installmax_products: The maximum number of products (including inactive/deleted) which can be created in the applicationmax_users: The maximum number of user accountsmax_accounts: The maximum number of Accounts.
Note In an multi-branch environment, the max_branch value should be including the one accout created by default for each branchmax_employees: The maximum number of employees which can be added to the systemmax_branches: The maximum number of branchesuse_workorders: If set totrue, Work Order feature will be enableduse_barcode: If set totrue, Barcodes will be enabled, and the below settings specific to barcodes will take effectbarcode_prefix: Constant PREFIX for all barcodesbarcode_seq_start: SEQ value for the first productshow_price_on_barcode: Price on barcode printshow_companyname_on_barcode: Company Name on barcode print
Initial Configuration
Once a new environment is provisioned for you, you will receive a welcome email from Legacy Systems (support@legacy.net.in) with the below information
Application URL: https://<Your_Domain>.lsim.app
Activation Code: <Activation_Code>
Activation email: <Activation_Email>
Username: lsim_admin
Password: <lsim_admin_pwd>
LSIM Activation Process
- Click on the application URL. You will be presented with the Terms and Conditions and Activation Form
- Agree to the Terms and Conditions
- Enter your name / Company Name
- Enter Activation email and activation code
- Click on the button, and you will be redirected to the login page
- Use the lsim_admin user and password received to login
Things to do before starting to use the application
- Create branches if you have a multi-branch environment
A branch with name
default_branchwill be created as part of provisioning. You should create your own branches- Goto Administration > Branches > New Branch
- Fill out the details
- Select if this is a master branch or not
NoteUsers who are assigned to Master Branches can view data from all the branches, as well as change branches for some entities such as Estimate, WO, PO etc
- Create your own user:
The user
lsim_adminis an internal user created as part of provisioning. You should create your own user- Goto Administration > Users > New User
- Select
app_adminas your user type to access all the features. - Select a master branch as this user's branch if this user need to have access to all branch data
- Select
- Logout and login as the newly created user
- Goto Administration > Users > New User
- Create product Types:
There need to be at least one product type to add products
- Goto Administration > Product Types > New Type
- Select a unit in which the product with this particular type will be measured
- Goto Administration > Product Types > New Type
- Create Expense Types:
Four different types of assets are already provided. To record company expenses, please add the relevant expense types for each Asset type
- Goto Administration > Expense Types. Add expense type for each type of assets by click on
- Install LSIM as a Progressive Web App (PWA):
Installing LSIM as a PWA will enable you to treat this as a native app (create shortcuts, dock or taskbar icons etc) and you can enable desktop/mobile notifications as well
- To install LSIM as PWA, open the URL in Google Chrome or Microsoft Edge Browser
- You will see a "App Available" prompt on the right hand side of the address bar. Click on it to install PWA
- If the label is not visible, click on the PWA install icon
 on the right side of the address bar, next to bookmark icon
 - One PWA is installed, Login and Goto Administration > Settings and Click on to enable Desktop notifications
LSIM Customization
We have included a number of settings which can be changed from the UI. All these settings are systemwide and will take effect immediately after change
Goto Administration > Settings
report_duration_days: This setting decides how far back the data will be desplayed on each page (the value for start date will bereport_duration_daysolder than today)items_per_page: This setting is used by the paginator to display data in pages. This value determines the number of records displayed in a single pageproduct_expiry_warning_days: For products with expiry dates, you will see a notification on the Products page if any Stock batches has expiry date which is within this many days from today. In Stock Batches screen, these batches will also be highlighted in Orange color.product_expiry_critical_days: If the expiry date of any Batch falls within this many days from today, that batch will be treated as expired, and will NOT be considered for invoicing (Stock will not be used). You will see an Alert notification for these batches in the Products page, and this batch will be highlighted in Red in the Stock Batches page.- Application Theme Settings: Various UI elements can be customized.
- Background: If the internal setting
ui_auto_bg_coloris disabled, a selectable list of preconfigured backgrounds will be available - Navigation Bar Color: For the top Navbar. If the internal setting
ui_auto_bg_coloris enabled, the background color will be based on this and UI accent color - UI Accent Color
- Primary Button Color
- Details Button Color
- Secondary Button Color
- Warning Button Color
- Background: If the internal setting
- PDF Settings: This section has the below settings for your PDF files
- PDF Print Type: This setting will dictate whether the Estimate, Invoice, Work Order and Purchase Order PDF are printed in A4 or thermal printer size. All other PDF's are always printed in A4 size.
- PDF Header Accent Color: The background color for PDF header
- PDF Table Accent Color: The backgound color for PDF table headers
- Display Style: This setting determines whether the contents are displayed as a table or cards. For mobile, the display style will always be Cards
- Navbar Text: If the Navigation Bar color is Dark, set this one as light and vice versa for better visibility and contrast
- System Notifications: You can enable or disable desktop/Android OS notifications
- Depending on your application version, some additional settings may also be available in your settings page
Logo Settings
Your company logo can be displayed on the Login screen, Navigation bar and all PDF documents generated
Layout
LSIM app layout contains a top Header, a content area and a footer pill menu
Header
The header will have the company name, LSIM Menu buttons, and Quick access Area

The quick access area contains the User password reset, Notifications, Admin, Settings and Log Out buttons
LSIM Menu
LSIM Menu is the central point of Navigation. On mobile, you will have a burger menu on top, wheras on Dekstops, the Menu will be right next to the Company name

Clicking on any of the Menu item will change the Menu name to that particular Page Name
Footer
The Footer will contain a full width link to Legacy Systems Website if you are not logged in
If logged in, the footer will be a Pill menu with links to Legacy Systems Website, Documentation and Direct Chat with Support

Shortcuts
On the Home Page and Dashboard Page, there will be some additional shortcut buttons

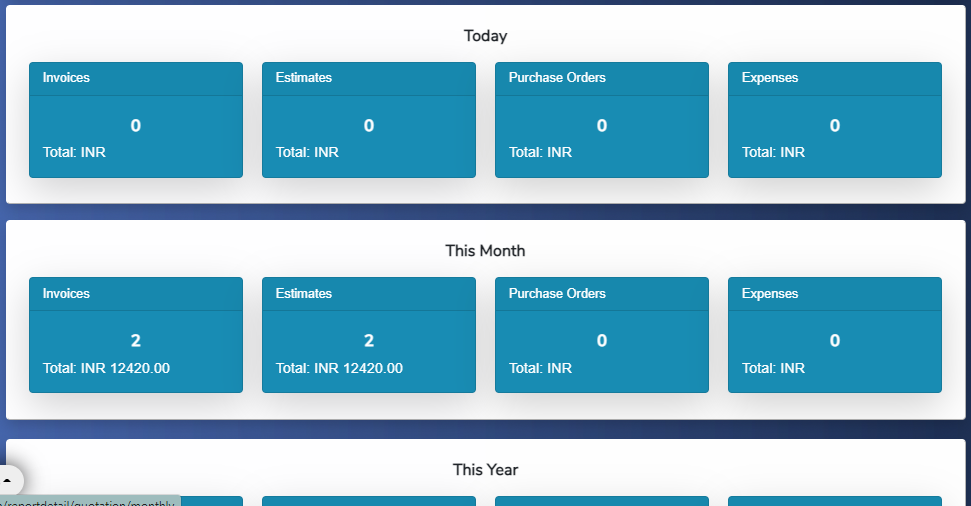
On the Dashboard Page, each card will open a historical data Graph of that particular entity
Usage
This section provides information regarding the usage of LSIM
General Workflow
LSIM application consists of the below entities:
- Branch
- Product Type
- Asset
- User
- Employee
- Vendor
- Customer
- Terms and Conditions
- Product
- Estimate
- Invoice
- Adhoc Invoice
- RC Invoice
- Work Order
- Purchase Order
- Expense
- Account
- Transaction
Most of the entities support the Create, Edit, Delete operations, except:
- Product Types, Vendors, Expenses and Account Transactions - cannot be deleted from the UI
If any of these entities need to be deleted, please contact support, and they will help you with this
To Create a new entity, go to the entity page and click on the Create button on the top right
To Edit an entity, click on the edit button  against the specific entity
NoteFor some entities like Estimate or Purchase Order, Clicking on the entity button will lead you to the edit page
To Delete an entity, open the entity page and click on
You can also mark and entity Active or Inactive using the respective button in the entity table, if available
Users and Privileges
When you create a new user, or edit a user, you can change the user Role and user Branch
User Role
You can set either Employee or App_admin role to a user.
A User with role Employee cannot access Reports, Accounts and Administration Menu.
User Branch
You can also select the Branch for the user.
If the branch assigned to a User is a Master Branch, the User can access entity data from all Branches.
Master Branch Users can also transfer Product Stock across different Branches.
If the branch assigned to a User is not a Master Branch, the User can only view and modify entity data from that particular Branch. They can, however view the Stock of Products from all branches
Products and Stock
You should provide a Product Code such that you can search for it for a new Estimate or PO. You can search for a product using this product code. We recommend a hyphen (-) seperated product name as the code.
When you add a new Product, you will have to specify if the Product has serial numbers.
This product has Serial Number / Identifier : For a Product with Serial Numbers, we can only add Stock as an Integer. Also when a Product with Serial Numbers is added to a Estimate, and an invoice is created from that Estimate, the system will pick up the serial numbers from stock automatically.
If you want to manually select a specific serial number, you can edit serial numbers after the invoice is created from the Invoice page.
You will also need to provide all serial numbers to be added to Stock for the product when a Purchase Order for that product is Marked Delivered.
If there is no need to manage serial numbers in stock, please create products without serial numbers. You will still be able to create/add serial numbers after the Invoice is created.
The Products page have options to Edit, View and Change Status for each Product.
When a Product is marked Inactive, the product will be moved to Inactive Products page, which is accessible through Menu > Administration > Inactive Products
The Product View page also has an option to Delete the product, which will reset the product stock to 0, along with moving it to Inactive Products page.
To permanently delete a product, you will have to first delete/mark it Inactive, and then go to the Administration > Inactive Products page and click on
Note If deleted permanently, all associated PO, Estimates, Invoices will be updated with Product name "Deleted Product". Please use this option with caution
This product has Expiry Date : If the product has expiry date and you want to manage the product stocks in batches, enable the switch "This product has expiry date" during product creation.
Create as "No-Stock" Product : Turning this option on means this product will not have Stock in inventory (eg: services). You will also not be able to add this product to Purchase Orders.
Minimum Stock : When the stock of a product falls lower than or equal to this value, you will see a notification on Products page and will be able to view this Product in the "Product with Low Stock" page.
Warning We recommend to turn off the "Serial Number", No-Stock and "Expiry Date" options during product creation unless it is absolutely needed. These options cannot be changed after product creation.
Add Stock to a Product
When you click the button on any Purchase Order, the product quantity in that PO will be added to stock for all Products in that PO
If the PO have products with Serial Numbers enabled, you will have to enter all serial numbers to mark the PO delivered and update the Stock
If the PO have products with Expiry Dates enabled, you will have to enter the Batch ID and expiry date when marking Delivered. You will also have the option to change Prices for that particular batch.
Add Stock to a Product Manually
Goto the product page and click on .
Enter the Stock to be added and click
If the User's Branch is a master branch, there will be also an option to select the branch to which this stock is to be added.
If the Product has serial numbers, you will have to fill the serial numbers for all the new stock being added.
If the Product has expiry dates, you will have to provide a batch ID and expiry date as well. If the batch ID you entered already exists for the product and branch, the expiry date will be populated and you can change the expiry date if needed.
Note If you change the existing expiry date, it will be effective for the entire batch including older stocks.
Info If you want the prices of stock being added to be added to the Account as well, instead of manually adding Stock, use Purchase Orders
Transfer Stock of a Product
For a multi-branch environment, you can transfer product stock across branches.
To do so, click on the Stock display button from Products table for the specific product. A pop-up window will show Stock of that product in all branches.
If the User's branch is a Master Branch, a button will be available.
Clicking on the "Transfer Stock" button will show a form in which you can select the Source Branch, Target Branch, and Stock amount to be transferred.
Click on button will transfer the stock from Source Branch to Target Branch.
If the product has serial numbers, instead to Stock Amount, all the serial numbers currently in stock at the Source Branch will be displayed, and you can select the serial numbers to be transferred to Target Branch.
If the product has expiry date, you cannot transfer stocks across branches. In that case, goto the Stock Batches screen for that product and manage (delete/add) Stock Batches and Serial Numbers manually.
Products with Expiry date
When adding a new product, you can select the checkbox "This product has Expiry Date" to manage all stocks of the product keeping the expiry date in consideration
You cannot edit an existing product without expiry dates and add expiry date to it. This has to be set during the creation of the product.
The Stock for a product which has expiry date is managed as Stock Batches, with each Batch corresponds to a particular expiry date. You will be required to provide Batch ID and Expiry date whenever you add Stock to a product with Expiry date.
When a new stock is added with an existing Batch ID, the expiry date will be autopopulated with the value already saved. You will also be able to change the expiry date, in which case the expiry date of the entire batch will be updated with the new Expiry date value.
Invoicing of products with Expiry date
If there are multiple Batches in the branch, Stocks will be taken from the Batch with the earliest expiry date for invoicing. If the Stock in that Batch is not enough, the next batch with earliest expiry date will be considered for the rest of the stock, after using the stock from the first batch.
There are two settings which decides the behaviour of invoicing and notifications regarding Expiry date:
product_expiry_warning_days : If the expiry date of any Batch is within this number of days from today, a warning notification will be shown at the Products page. The Batch will also highlighted in Orange in the Stock Batches Page.
product_expiry_critical_days : If the expiry date of any Batch is within this number of days from today, the batch will be considered expired, and will not be considered for Invoicing. You will get a "out of Stock" error even if you have stock in this Batch, and no stock in other Batches.
The Batch will be highlighted in Red in the Stock Batches page
Customers
For customers, along with the contact number, address and other details, you will also be able to specify a Credit Period, which is the number of days to give credit to the customer.
Customers page will have options to Edit, View and Change Status for each Customer.
Within the customer page, you can view the outstanding balance for the customer, View all transactions for the Customer, and Create a Pending Statement for the customer.
Pending Statement will take into account the Credit Period Setting for each customer, and divide the statement PDF into two sections - One for Invoices generated within the Credit Period, and one with Invoices generated before Credit Period (Overdue).
Note If a Customer is deleted, all associated Estimates, Invoices and Customer Transactions will also be deleted.
Note For product returns, if the payment is already received and a refund is made to the customer, after entering the return transaction from the Invoice page, you will also need to manually add the refund transaction in the Customer transaction page. Goto Customers > Customer Name > Transactions and add a new transaction with transaction type as Return.
Note You will need to add at least one customer to create Estimates and Invoices
Invoicing
Creating a new Invoice is a 2-Step process in LSIM. First, prepare a new Estimate and then generate Invoice from the Estimate.
To create a new Invoice:
- Goto Estimates > New Estimate. You can also use the New Order Shortcut from Home Page, or New Estimate button from a Customer Page
- You will be asked to select a Customer. Customer can be selected from a drop-down list, or you can enter the customer's mobile number in the field above.
- If a Customer is not found with the entered mobile number, you will be redirected to the customer creation page, and after creating the customer account, click on New Estimate again to create Estimate
- You will be able to select the branch for the Estimate if your user account is assigned to a Master Branch
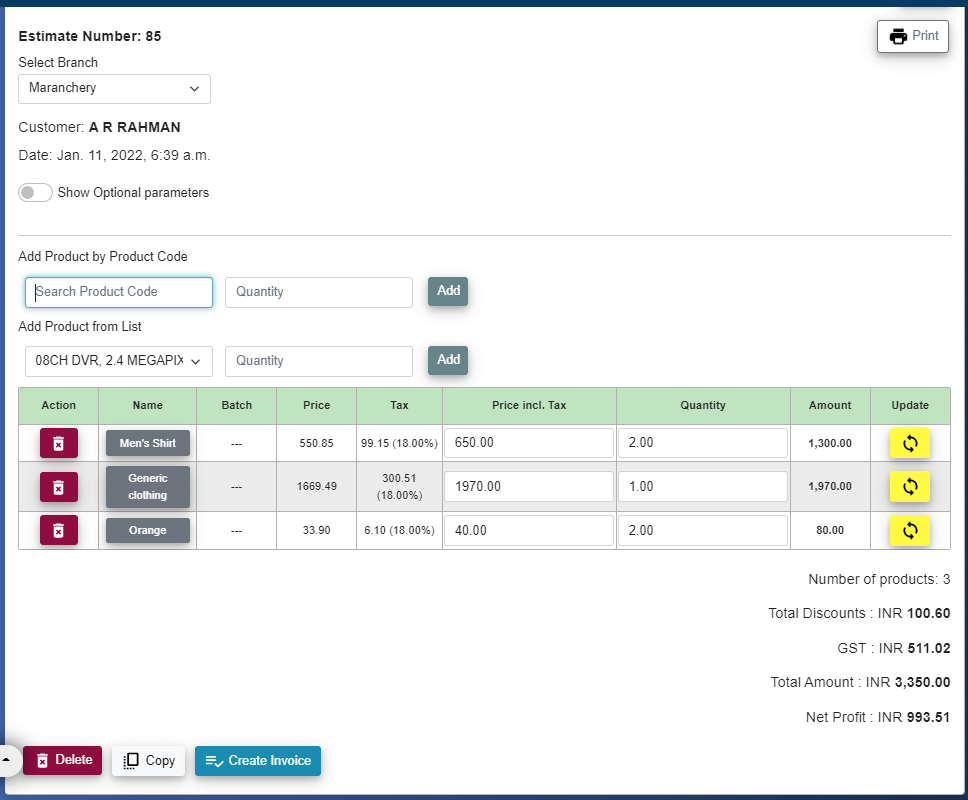
- In the New Estimate screen shown below, you can add or delete products to the Estimate
- Product can be added either from the drop-down list or by searching in the field above by the Product Code
Note If Auto Save Estimate is enabled in Settings, the estimate will be saves as soon as it is created - Added products will be displayed in the table below. All amounts will also be updated accordingly whenever you add or delete a product. You will not be able to edit the quantity in the New Estimate screen, but you can change the quantity from the Estimate edit screen after the Estimate is saved.
- Clicking on button will create the Estimate and show the edit Estimate page
- You can still make changes to the Estimate and generate PDF for the Estimate
- After adding products, you will be able to specify a discount amount and quantity for each products. Cicking on the update button correspoding to each row will save that particular row for the estimate and update the total Amounts
- The tax amount for each product will be calculated based on the tax percentage set for the particular product type and whether the product price includes tax amount (set during product creation)
- Once the Estimate is finalized, click on button to create Invoice.
- You can also copy the Estimate to a different customer from the Estimate View page
- If sufficient stock of all products are available, a new Invoice will be created, and you will be redirected to the Invoice View page, from where you will be able to make any payments, create PDF or delete the Invoice
- All serial numbers assigned to an Invoice will be displayed in the Invoice page, which can be changed if needed. The new serial number also should be available in stock for the specific branch to be able to update the Invoice
- Click on button to add payment to the invoice. You can select the account to which the payment need to be added in the Add Payment screen.
- All the payments made for an Invoice can be viewed in the Invoice page, and you will be able to print the Payment Receipt for each payment
- Once a payment is made on an Invoice, you cannot delete the Invoice

NoteIf the application is closed before creating a new Estimate, all data in the prepare page will be lost. However in the Edit Estimate screen, all changes you make (adding/editing products, discount etc) will be saved instantly.
NoteIf the Invoice Amount is to be reflected in Accounts, you should add/update payments made for the Invoice by clicking on the button in the Invoice Page
NoteMultiple Invoices can be created from the same Estimate. You will also be able to view the invoices created from a Estimate in the Estimate view page
NoteIf setting use_salesman_code is enabled, you will need to enter a valid salesman code and PIN (assigned to each application user using the User management page), and the invoice will be considered to be created by that Salesman irrespective of the logged in User
Different Types of Invoices
If enabled in your environment, you will be able to create RC Invoices and Work Order based Invoices along with the regular Invoices
For these Invoices also, you will need to mark Payment to add the Invoice Amount to Accounts
RC Invoices
RC stands for Rate Contract
This types of Invoices are ideal if you are billing your clients for usage of Devices owned by you based on the usage amount of each device
To create RC Invoice, you will first have to create RC Devices. Goto Adminstration > RC Devices to create and manage RC Devices
In the RC Devices
Adhoc Invoices
This types of Invoices are ideal if you frequently create invoices with Products or Items which are not in the Inventory and are not needed to be added to the inventory
You can just select the Customer, add products, quantity, price and tax percentage on the fly and Save the Invoice.
Purchase Orders
The process of creating a Purchase Order is similar to that of creating a Estimate. There are some differences in Purchase Order:
- You will need to select a Vendor instead of a Customer for PO
- You will be able to select the branch for the PO if your user account is assigned to a Master Branch
- Once a PO is created, you will be able to mark it as Paid and Delivered. You can also partially pay for a PO, in which case the status of the PO will remain "not-paid". The amount to pay, by default will always be the balance you need to pay for the PO.
- Once a PO is mark Delivered, you cannot make any more changes to the PO
- Once the PO is created, you cannot change the Branch for the PO
- You will be able to update the PO with the respective Invoice ID, if available
- If the PO contains products with Expiry dates, you will need to enter the batch ID and expiry date for each of those products once you mark it as Delivered
NoteWhen you mark a PO as Delivered, the stock will be updated for the products listeed in the PO with the respective quantity, along with the Serial Numbers, if any. You do not need to manually add stock in this case.
NoteIf the PO Amount is to be reflected in Accounts, you should add/update payments made for the PO by clicking on the button in the PO Page
Accounts and Expenses
Accounts
You can keep track of all your business expenses and keep a ledger for multiple accounts using Accounts and Expenses in LSIM.
By default, when a new instance is provisioned, there will be two accounts created - Primary Account and Cash Account.
Whenever a new Branch is created, a new Cash Account corresponding to that branch will also be created, but the Primary Account will remain common to all branches.
For all PO and Invoices, whenever a payment is added, a corresponding transaction will be added to the selected Account with the respective transaction type.
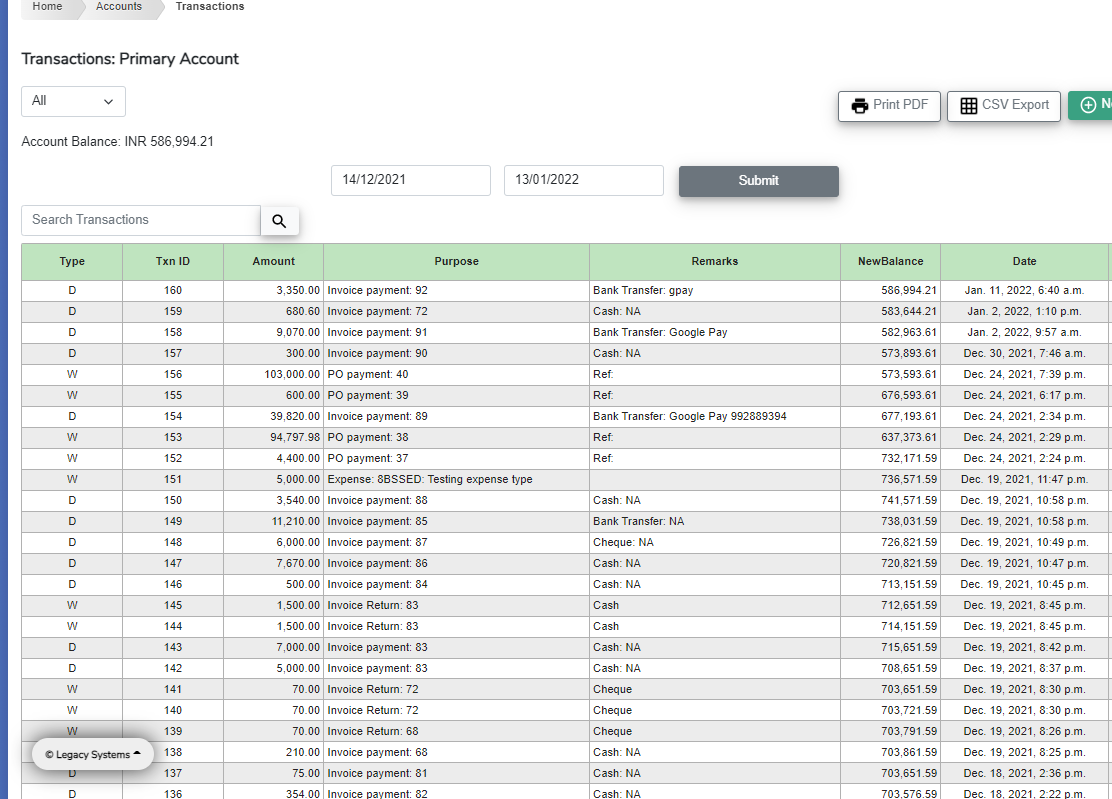
You can also manually add a new transaction to an account from the Transactions page for the Account. The usual Print to PDF and CSV Export buttons are also available in Transactions page, along with the Start date and End date selectors.
You can also Edit an Account to add more details like Bank Account Number, MICR code etc.
Expenses
In order to record business expenses, you will first need to add Assets, and Expense Types. Please see Initial Configuration for more details.
An expense should be added on an Asset, and you will be able to create PDF reports or CSV export from the Expenses page.
All expenses are added to Accounts by Default. There is not seperate Payment step for expenses, unlike Invoices and Puchase Order
NoteYou cannot delete or modify an Account transaction. Create adjustment transaction from Accounts Page id needed
Salary Expense
Add Employees in the Employee Management Page (Administration > Employees)
In the Employee page, you will be able to add a new Salary Transaction, which will also be added to Expenses and Accounts
NoteYou cannot delete or modify an Account transaction. Create adjustment transaction from Accounts Page id needed
Account Statemet / Trial Balance
For each Account, you will be able to generate an account statement by providing a start date and end date.
Goto Accounts > Select Account > Click on
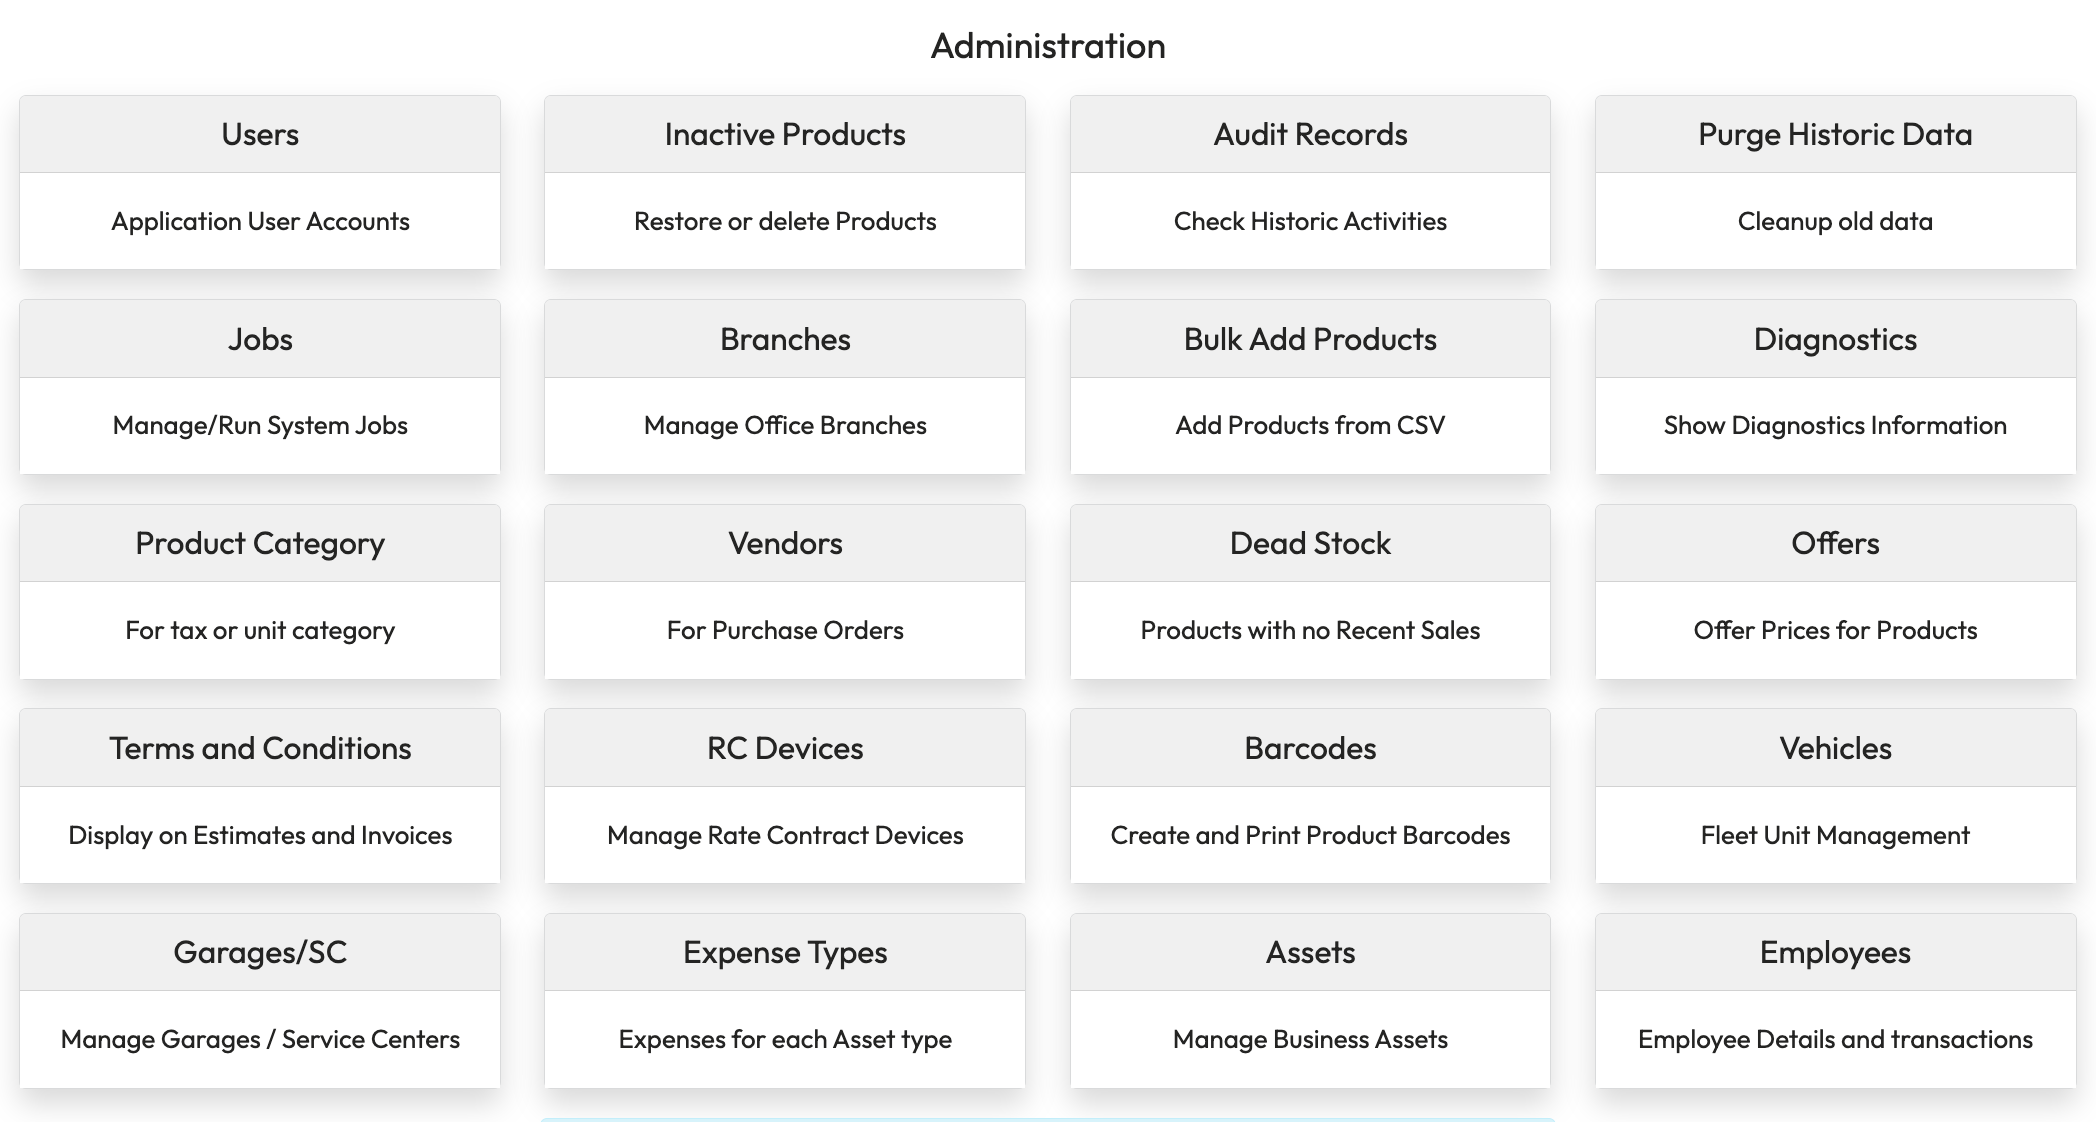
Administration
Administration page is where you will be able to make changes to the root components of your LSIM environment like changing settings, modify Vendors etc. You will also be able to view your LSIM instance Activation Details from the Administration page
NoteYou should be logged in as a User with app_admin role to be able to view Administration page
Terms and Condition
Goto Administration > Terms and Conditions page to add or delete terms and conditions which are to be printed on Invoice or Estimate PDF
For each Terms entry, you will be able to select if that particular Terms is to be displayed on Estimate, Invoice or both
Users, Vendors and Employees
You will need to add Vendors to create Purchase Orders. Users and Employees also can be managed from the respective views.
In the Employee View, you will be able to view all Salary transactions for that particular Employee
In the Vendors page, you will be able to view Purchase Orders for each vendors.
Assets and Expenes Types
By default, the below listed Asset Types will be created for you:
- Real Estate
- Vehicle
- Office Device
- Others
In order to add Expenses to each Asset, you will need to add the different expense types for each of the Asset types listed above.
- Goto Administration > Expense Types
- Select the Asset Type from the drop-down to view and edit the Expense Types for that particular Asset Type. You can also add or delete Expense Types to a particular type of Asset.
Auditing
Auditing of specific events are enabled by default. These events include Delete event of Customer, Invoice, PO, User.
A audit record of all login events will also be saved with the username and IP of the client machine
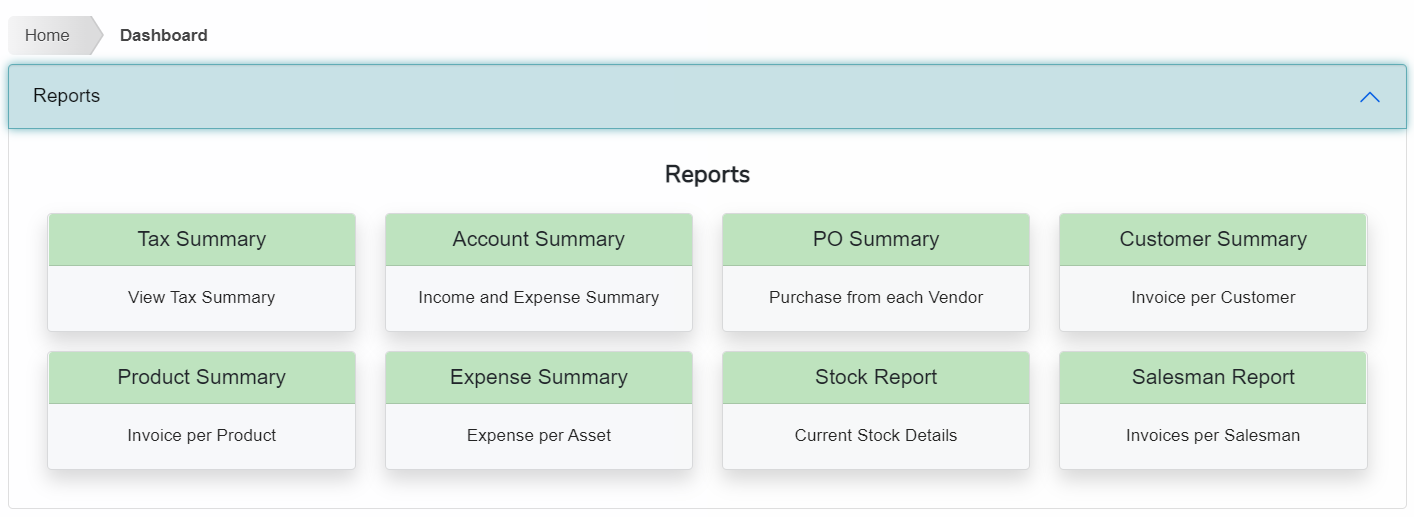
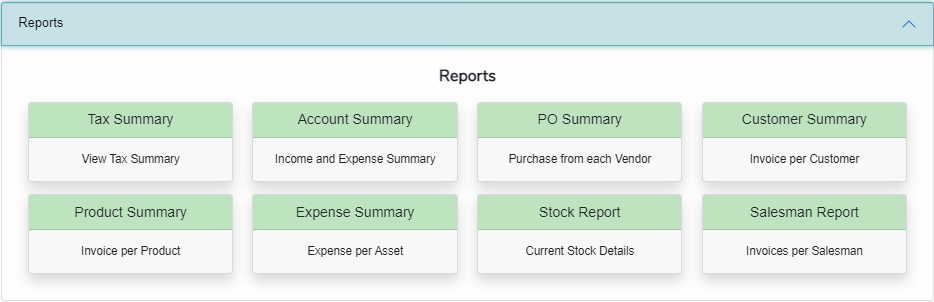
Reports
LSIM has an extensive reporting framework which will enable you to have a multi dimensional view of your business
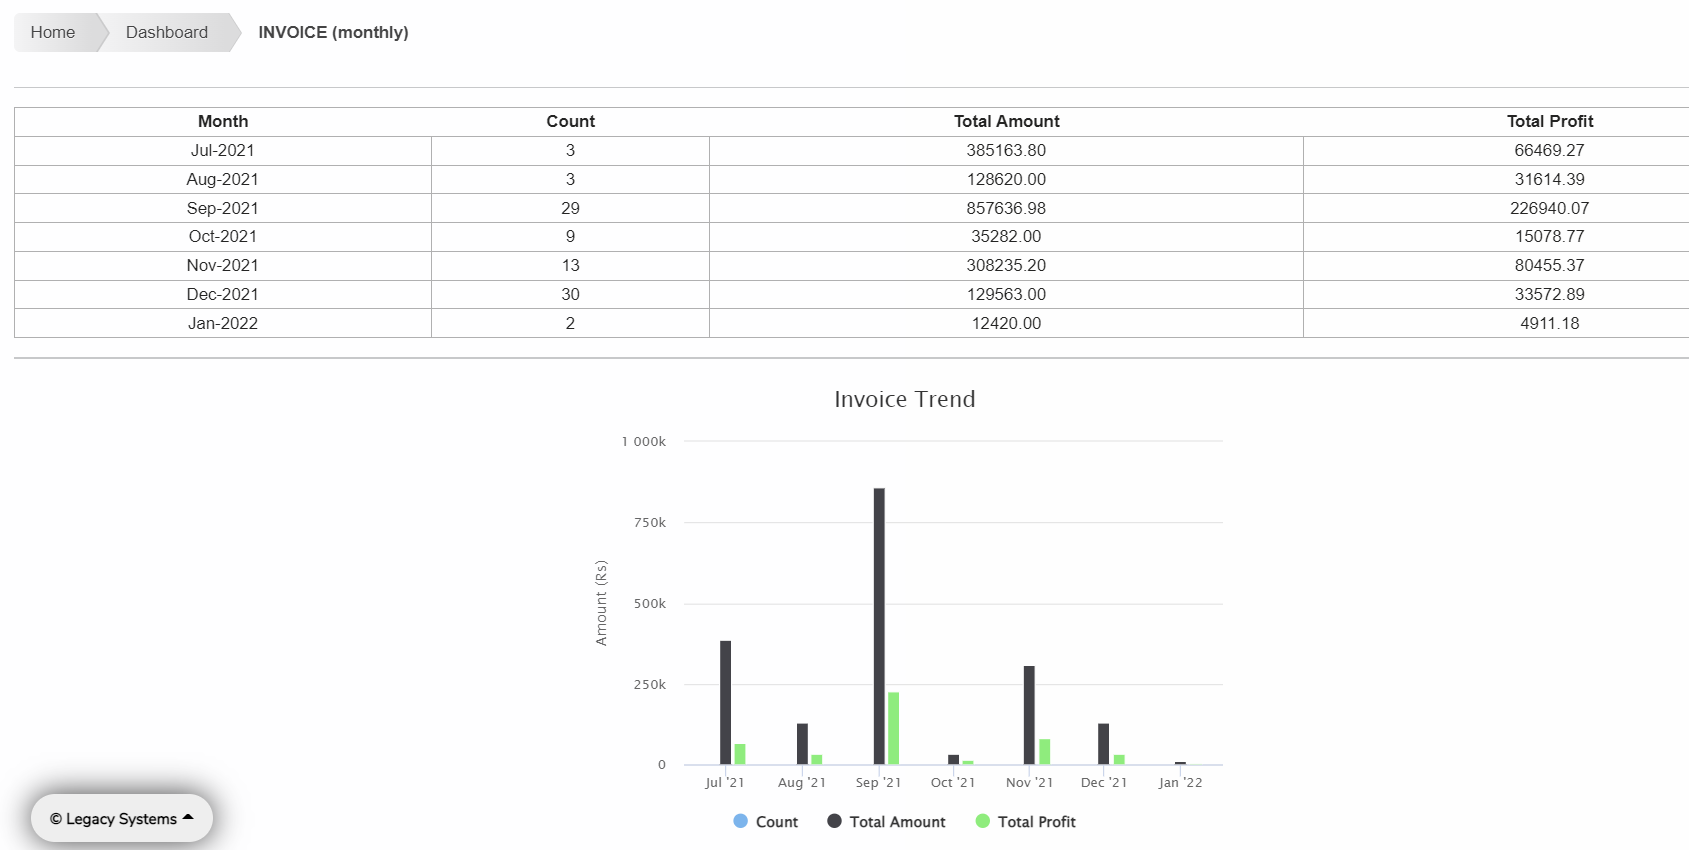
LSIM Dashboard
Gives you Daily, Montly and Yearly Summary of your business. Each Dashboard card will also show you the historical performance in both tabular and graphical mode
LSIM Custom Reports
Click on the expanding menu on top of the Dashboard page, and you will have access to all custom reports. We can create additional reports if needed as well.